Jump to:
Prepare the import spreadsheet
Manually approve attendees after importing
Extra columns not included in the template
Add existing Custom Fields to your import
Other helpful related articles:
Create and Organise Groups (required for the 'group' column)
Manage Meeting Locations (required for 'attendee/organisationmeetingpoint' columns)
Step 1: Prepare the Import Spreadsheet
- Click here to download the Import Template spreadsheet. When downloaded, open it in your chosen spreadsheet editor. Microsoft Excel (paid/free web version) or Google Sheets are recommended.
- The first row can be deleted, as it is only used as an example. View the table below for any extra columns you may want to add (Custom Fields, passwords, etc.). Included columns are mandatory.
- Paste from an external source or type in your data, following these 5 steps:
- Essential data: you must add at least the first name, last name, and email address for each delegate. Unless solo, an organisation name must also be entered.
- Every attendee must have their own unique email address, as this is used to receive system emails and log into your event. Alternate emails can be the same across multiple attendees if needed.
- For companies with many attendees, make sure the company name is exactly the same across all records, otherwise the system will split them apart and render them unable to book meetings together. If this does end up happening, it can still be fixed after the import.
- If an attendee has no company or organization affiliation, such as a student or freelancer, leave their 'organisationname' field blank.
- To save you time, confusion and stress, only import new attendees to lower the risk of duplicates.
- When you have finished entering data into the spreadsheet and have double checked all records are correct, save it to a safe place that you can easily locate later.
Step 2: Import your data
- Navigate to the Import tab, then choose 'Import attendees from file' on the right. If this is your first import, you may not need to choose this.
- Click the grey 'Choose file' button and locate the spreadsheet you created. Then, click 'Next...'. If the system gives you an error or the data it shows is incorrect, save the spreadsheet as a .csv file instead and reupload. If you are still having problems, create a support ticket at the top of this page.
- On this page, you will be shown a variety of information about your import, including all attendees found in the file. Do not worry if any fields are missing from this screen, they will still be imported.
- If you would like all attendees to be approved instantly after the import is finished, check the 'Approve organisations' box. Everyone in the file will receive their welcome email and password to log in. Otherwise, leave this box unchecked if you would like to approve everyone at a later date.
- If you are happy with the information the screen is showing you, click either of the two blue buttons to start the import. Else, click 'Abandon' in the bottom right to discard the file and the import.
Imports run at around 50 entries per minute and can be left alone to import by itself. To check if the import has finished, check the 'Attendees' tab or go back to the same import page.
The 'Pending Import' screen will not upload any spreadsheet data until one of the blue buttons has been clicked.
- Duplicate entries will not be imported unless they include new fields, in which case they will update the existing profile(s).
- Visit the Troubleshooting section below if you encounter any problems.
Manually approve attendees after importing
- Navigate to the Organisations tab and in the Page Size widget at the right, select 'All' to ensure you approve everyone.
- Choose 'No' in the Approved dropdown box.
- Check the tick box at the top of the company list, to the left of 'Name'. If you only want to approve certain companies, check the boxes to the left of their names instead.
- Scroll to the end of the list, select 'Approve' in the 'Choose an action' dropdown, then click 'go'.
- A notification will appear when approval is finished, along with affected attendees receiving their welcome emails (unless system emails have been disabled). Reset the filter to view all organisations as normal.
Extra fields not included in the template
Extra data may be added simply by adding an extra column to your Import Template and naming it with the one of the Field Names below. These fields are not included in the template as they are not mandatory but can be added if you wish. Attendee or organisation specific fields will not work for the other group unless a Custom Field is created under the same name.
| Column name | Description |
| Attendee specific fields: | |
| title | Person title, not job title, e.g. Mr or Mrs |
| phone | Landline/Work number |
| mobile | Mobile number |
| jobtitle | Job title, e.g. CEO, President |
| alternateemail | Alternate email address - will also receive a copy of system emails |
| attendeemeetingpoint | Custom meeting location that only this attendee can request meetings at |
| password | Do not create this column unless absolutely necessary, the system by default will auto generate a password then email it to the attendee along with their welcome email |
| [Custom Field name] - e.g. Biography | Creates a new text custom field if it doesn't exist and any text in this column is added to the field for the appropriate attendee |
| Organisation specific fields: | |
| fax | Company fax number |
| address1, address2, address3 | 3 different columns, supporting 3 different address lines |
| town | Company town or city |
| state_county | Company state, county or province |
| postcode | Company postcode/zip code |
| country | Country where the company is based |
| companyphone | General company phone number |
| website | Company website - start the link with either 'www.' or 'http(s)://' |
| profile | Short company description, e.g. We are based in America and will never give you up.' Supports HTML if needed but formatting may not appear correctly after import |
| organisationmeetingpoint | Custom meeting location that only this company can request meetings at |
| group | The group the company will participate in - leave this unless you have created Groups already |
| [Custom Field name] - e.g. Company Description | Creates a new text custom field if it doesn't exist and any text in this column is added to the field for the appropriate company |
Add Custom Fields to your import
If you have already created Custom Fields for attendees or organisations to use, you can include them in your import. However, unless you are filling in the field on behalf of an attendee or company, it can be left out of the import and filled in by the person or company themselves in their account. Otherwise:
- Add a new column to the spreadsheet with exactly the same name as the Custom Field you would like to add data to.
- In the appropriate record, add the information you would like to add under the column. Formatting may not be preserved upon importing, so add any fields that require special formatting (such as text with titles, HTML embeds) after the import.
- Follow this step if a new field was created: After the import, go to the Setup tab and choose 'Custom fields' in the upper right menu. Find the field and configure the options to your liking before clicking Save.
- Visit the Organisations or Attendees tab and click 'Edit' under the right name to check if the field filled in correctly. You can update the field data from here if needed too.
If a Custom Field is not already in the system, it will be imported as a new ‘text’ field. Additionally, any options not already included in a Custom Field on the system will be added.
Troubleshooting
Problem: Data import errors
Meeting Mojo is set up to alert you to most import errors at the time you upload your data. Most commonly an alert is triggered when an essential piece of data is missing. Please make sure you enter at least email, firstname and lastname for each delegate in your import spreadsheet.
SPECIAL NOTE: if you leave organisationname blank, the entry will import as a Solo Attendee with no company or other affiliation. Check the Dashboard after import – if there are more Solo Attendees than you expected, check your import file and try again.
Problem: Missing columns reported
Solution:
 If the error message refers to one or more rows, there is data missing from required fields. Check that all email, firstname and lastname cells are filled, save the file and try again.
If entire columns are missing, check the spelling of your column headers. Copy/paste these from the upload page. If all 4 required (bold) columns are missing, you may be trying to upload an incorrect filetype. Resave as .xls or .xlsx.
Problem: Duplicate email address
Solution:
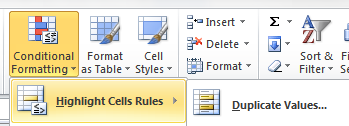 If you input the same email address for more than one delegate, only one of the entries will be imported. Ensure that all email addresses in your imports are unique. You can check this on Excel by using the ‘Highlight Cells Rules’ option under ‘Conditional Formatting’ on the home tab or by using CTRL+F to search for specific addresses.
Problem: 'Unapproved' attendees are indicated on the Dashboard
Solution:
1. Open the Organisations tab
2. Select 'No' under 'Approved', then click Filter
3. In the Page Size widget at the right, select 'All' if you have many delegates (the page will refresh)
4. Check the box at the top of the company list, at the left
5. Scroll to the end of the list, select 'Approve' in the 'Choose an action' dropdown, then click 'go'
A notification will display when your selection has been approved.
Repeat steps 3 and 4 until no more organizations are displayed, then reset the Filter.
Problem: A delegate’s Welcome email was not sent
Solution:

Check the Dashboard for a Welcome message Notification: if there is one, click ‘more’ within the Notification
The Attendees tab will open. Choose 'no' under 'Welcome email sent' and then click Filter
At the bottom of the page, select ‘Welcome’ in the 'Choose an action' dropdown, then click ‘go’. The Welcome email will be sent to the attendees selected.
Problem: There is more than one entry for the same company.
This usually happens when a slightly different spelling is used for the company name by two or more of its delegates on registration. For example: Mann Co and Mann Co, Inc. Make sure similar company names are actually the same company, as subsidiaries sometimes use similar names but are completely separate.
Solution:
Click the Organizations tab and type the company name under 'Name' then click Filter.
Choose the company name that you consider to be incorrect and click on its name to open the Organization View page.
Click Edit next to the Attendee name to open their Edit page.
Click 'Change affiliated organisation' on the right hand menu and choose the correct company in the dropdown box that appears.
Click 'Change organisation' to return to the employee's profile page.
Repeat steps 3-5 for each attendee in the ‘incorrect’ company. If there are multiple duplicate companies, repeat all steps until complete. When the duplicate company shows 0 attendees, open the Organisations tab and click 'Delete' under each necessary entry.
CAUTION: If you delete a company that has attendees, the system will delete those attendees and any meetings they may have. Please ensure that the attendee number shows 0 before deleting.